
Disclaimer:
The purpose of this website is to provide general guidance, ideas, and useful tips. We do not provide professional advice and this website should not be relied upon as such a source. Neither North American Sauna Society nor the author (who is unaffiliated with the organization) promote individual techniques, structures, or solutions. Please always consult a qualified professional expert prior to building or acquiring a sauna or any accessory related to sauna bathing such as a shower, cold plunge, place to rest, etc. Always read and follow any relevant manuals and safety instructions and consult a doctor beforehand to determine if sauna bathing and/or associated activities are appropriate and safe for you.
by: Derek Davis
It was sometime in the late 70’s - I was on a road trip in southern Oregon with university friends and we decided to take a break at McCredie Hot Springs, not far off the Willamette Highway. Soaking in the springs was great, but the submersion afterward in the icy waters of the adjacent Salt Creek really took my breath away. This was my first experience with temperature-cycling and something I would never forget.
A decade later, I was to rediscover this pleasure in Garmisch-Partenkirchen, Germany. There to provide technical support to my company’s marketing team, I lucked into an après-ski event hosted by our sales office at a recreation center, something to which an engineer such as myself would not normally be invited. A large complex, it naturally had a sauna, but more significantly, a 60°F cold plunge. I must have done six rounds back and forth. At that point, the hook was firmly set, and I knew I would eventually have to have my own personal sauna and cold plunge.
So in the early 90’s, when my wife and I were looking to build a new home, we chose a lot that would accommodate an addition once the builder was finished. This addition was to have not only an attic for storage (sorely absent in Arizona homes) and a workshop, but a sauna, shower, cold plunge, and pool-equipment room.
This article provides an overview of our experience in designing and implementing this cold plunge system, something rarely found in a high-end custom home, let alone a mid-range residence such as ours.

Primary Considerations
There are several points to carefully consider in designing a cold plunge system. I address the major ones below along with the approach I took for each. This is not to suggest mine is the only or best way – indeed, in some cases, I regret the choices I made. Hopefully the reader can benefit from my experiences.
I use the acronym TIWC for Things I Would Change.
Cold Plunge Design
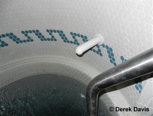
As our cold plunge was to be in new construction (the addition to our house), we were able to easily integrate it with our little sauna/shower complex. It is an in-ground, concrete cylinder 6 feet deep and 42 inches in diameter, holding approximately 450 gallons of water. The inside is tiled in 1” hexagonal shower tile.
Construction steps included:
- excavating an oversized hole
- pouring a concrete base in the bottom
- allowing this to cureplacing a large sonotube
- placing the plumbing fixtures (drains and inlet)
- pouring the walls of the plunge on the outside of the sonotube
- allowing that to cure
- removing the sonotube (peeling it out)
- eventually pouring the slab of the addition around the plunge
Access
Located just across a hallway from the sauna, the plunge is entered via a stainless steel pool ladder. The plunge is too narrow to jump into, something that would be dangerous in any case. With the water depth at 5’ 6”, it is easy to submerge completely with a slight bend of the knees.
TIWC: deepen the plunge to about seven feet to accommodate taller people.
Drainage
We installed a floor drain a foot or so from edge of the cold plunge to capture runoff when exiting the plunge.
Filtering
Just as for a pool or spa, it is important to filter the water in the cold plunge to keep it clean and free of suspended contaminants.
Our system consists of a 2-speed (1 HP or 1/6 HP) main circulation pump with a leaf trap, followed by a 50 sq ft cartridge filter. Two parallel drains set low in the plunge walls opposite each other feed the pump. A single directable inlet set in the plunge wall about 1’ below the water surface feeds back into the plunge. Note that twin drains may be mandated by your local building code so as to prevent a bather from blocking a drain, creating a suction, and being trapped below the surface. This used to be a problem with hot tubs.
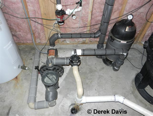
The cold plunge equipment (like our pool equipment) is all located in an adjacent “equipment room”. Thus, unlike typical pool equipment installations, it is protected from the elements. This room has a sunken floor and floor drain, making maintenance tasks much more pleasant.
We run the circulation pump on low-speed 24/7 (for reasons provided later) and the system has worked very well. Nevertheless, there are several TIWCs:
- If possible, downsize the circulation pump to even less than 1/6 HP, as the current water flow could easily be halved or quartered.
- The leaf trap, while important for outside pools, plays no role in this type of installation. I have never, in 18 years, had to remove anything from the leaf trap.
- The filter could also likely be downsized, though perhaps there is little benefit in doing so.
- Add a skimmer (or rather, a surface-level drain) to the drain system. I originally assumed that since there would be no leaves, a skimmer would be pointless. But a way to capture floating hair would have been very useful. As it is, I’ve had to cobble together a ladder-mounted skimmer bag that fulfills this function – a functional, but not particularly esthetically-pleasing approach.
- Add an auto-filler to compensate for evaporation. Although the rate of water loss is low due to the low temperature, I do have to add an inch or so every couple of weeks.
- Add a third drain in the floor of the plunge along with appropriate valves so that fully emptying the plunge would be possible. Currently, emptying the plunge for cleaning (though I’ve only had to do this once, after 16 years of operation) requires the use of a sump pump to get that last 12 inches of water. A floor drain would also capture sand/other particles that tend to collect and swim around at the bottom.

Chiller System
We chose to use a large remote drinking-fountain chiller to cool the cold plunge. The chiller is plumbed in to a diversionary loop downstream from the filter, with its own booster pump.
Although the chiller has its own thermostat, we use a timer to control the times of operation.
Of course, there are downsides to this approach:
- the hysteresis of the water temperature is higher than would normally be in the case when utilizing a thermostat; our plunge cycles between 58°F and 62°F over the course of one day
- adjusting the temperature (or range) requires a trial-and-error approach of tweaking the schedule of the chiller rather than simply adjusting a thermostat
However, the upsides are substantial:
- scheduling the chiller to operate only during the hours when electricity in our area is cheapest
- significantly reducing the number of compressor start-up cycles and, thus, presumably increasing the life of the chiller
Until two years ago, the chiller we used was an air-water type – this is to say, the waste heat is removed by blowing (room) air over the hot-side coil of the chiller. So you get cold water on one side, hot air on the other. While this worked well enough, this system had the disadvantages of:
- substantial noise from the blower fan and
- heating the air in the equipment room, thus placing an extra load on the air conditioning for that part of the house
So when the chiller compressor finally failed after 16 years of 6-9 hours/day operation (a decent product life), we replaced it with a water-to-water model. The difference is that the cooling of the hot-side coil is provided by some water source, also with its own booster pump. In our case, that cooling water is from our backyard pool, for which the support equipment is conveniently located in the same equipment room. So now, the equipment room is significantly quieter (no blower fan) and cooler (waste heat goes into the outdoor pool, rather then into the indoor air).

Sanitizing
Pool water requires some means of sanitizing to kill bacteria, usually through dissolved chlorine – the same applies to a cold plunge. We chose ozonation for this purpose. The ozone is generated in a small UV lamp and drawn through a tube to be injected into the water flow (downstream of all other equipment in the system) through a venturi. The venturi’s required pressure differential is created by a small booster pump.

Ozone has a low half-life in water, meaning that it only disinfects for about 20 minutes after injection. For this reason, we operate the filtration and ozone injection system continuously (24/7). Since the ozone lamp is not generally power-cycled, its operational life is much greater than normal. In 18 years of operation, I have replaced the lamp only twice, and one of those times wasn’t even due to natural bulb failure.
We have found ozonation to be extremely effective, without the negatives (smell, cost, hassle) associated with chemical usage. In fact, I don’t even have to adjust the pH of the water – something absolutely required when using chlorine. And in 18 years, I’ve only changed out the water twice.
Safety
One easily-overlooked issue is that of child safety. A cold plunge is really no different than a swimming pool and, at least in our case, is in a location that may often not be lighted. And though the ladder is inherently always within reach because the plunge is so narrow, securing access from small children should be considered. In our case, there are three doors to the sauna/shower/plunge complex. Each door is spring-loaded to be self-closing and has a standard door handle with its spring-loaded latch. In addition, each door has a second spring-loaded latch, operated by thumb-turn knob on the interior side and by a key on the exterior side. Removal of the key prevents anyone, especially loose children, from entering the complex by that door, yet does not prevent those within the complex from exiting (for fire safety).
Note that while our local building inspector was very persnickety about safety barriers for our backyard pool, he had no concerns about access to the cold plunge. Apparently, at least in that inspector’s mind and to those at the building department who inspected the plans, no safety barrier was required by code. On the other hand, it would be unfortunate to be nearly done with construction only to have the inspector say “whoops, what about a safety barrier?”
And while we’re on the subject of safety, I should note that local building codes normally require that all electrical pool equipment be earth-bonded to protect bathers from a possible short circuit. This applies to the chiller, all pump motors, ozone generator, etc. In addition, the ladder into the cold plunge must be earth-bonded.
Optional Features
Here are few items we have implemented beyond what’s strictly necessary for a cold plunge.
Pressure Gauges
Usually, there is a pressure gauge built into the filter to alert the user when the filter is clogging up. For your cold plunge, this will likely never happen. But pressure gauges at other points in the system can be useful, both to verify correct operation and to diagnose problems.
In particular, for an ozonation system with venturi injection, it is very useful to have gauges upstream and downstream of the injector so that one can dial-in the pressure drop across it and obtain the desired ozone injection rate.
Waterfall Shower

In Germany, facilities with a cold plunge frequently also have something called a Schwallbrause or Waterfall Shower. This special type of shower head delivers a high flow-rate sheet of cold water and is great for rinsing off prior to entering the cold plunge.
Unfortunately, the cold water in Phoenix, actually isn’t, at least not in the summer. A better description would be lukewarm.
To address this, I built a heat exchanger, using cold plunge water to cool a separate storage tank. That water, in turn, feeds the Waterfall Shower.

This is done with another diversionary loop downstream from the chiller output, but upstream from the ozone injector. A small circulation pump drives the water through a copper coil wrapped around the storage tank.
TWIC: Replace the “lukewarm” cold water feed to the regular shower head with the same chilled water of the Waterfall shower head.
Fill Faucet
Although we do not have an auto-filler to compensate for evaporation, there is a manual faucet directly above the cold plunge, making topping off extremely easy. Even if an auto-filler is implemented, I recommend a separate faucet for two reasons. First, filling the plunge from empty using just the auto-filler will take forever and, second, it is very convenient for refilling the sauna bucket.
System Monitor
First, a bit of background. The ozone system normally includes “gas check-valves” in the delivery tube from the ozone generator to the venturi injector. The purpose of these is a block reverse water flow that can occur if the injection booster pump fails or loses power. Unfortunately, over time these check-valves tend to fail in the open position so that by the time they are needed, they don’t function and the ozone generator is destroyed. This is not just theoretical – I speak from experience.
A more reliable solution uses an in-line float sensor in the delivery tube, detecting reverse water flow so that the main circulation pump can be shut down before water reaches the ozone generator. This is one function of the System Monitor.
A second function is to automatically shut down the chiller and its booster pumps in the event that either the cold plunge or pool main circulation pumps fail or lose power. This assures that the chiller doesn’t either freeze up (on the cold side) or overheat (on the hot side).

Wrap up
I hope the reader has found this article of interest. I would be more than happy to hear of your own experiences on this topic and can be reached at derekdavis@cox.net.
Finally, for reference here is a simplified plumbing schematic of our installation:
